Instructions on how to run an experiment with Cylc
Instead of submitting any job on the command line, you will run everything through the Cylc interface.
- Running any queue commands on the command line directly can cause Cylc to become out of sync.
- All tasks within the workflow are updated within its internal database. So, if cheyenne goes down, it can pick up from where it left off.
Background information on Cylc
Cylc is a workflow engine that submits jobs to the queue for you in an order that matches the dependencies between the tasks. It is mainly used to run weather and climate models, but it can be used to run any type of workflow.
Cylc was originally developed by Hilary Oliver at NIWA, New Zealand. Since then the UK Met Office has provided additional support and functionality. It has been adopted by a number of centers including:
- National Institute of Water and Atmospheric Research (NIWA) - New Zealand
- Met Office - UK
- Max-Planck-Institut für Meteorologie - Germany
- Deutches Klimarechenzentrum (DKRZ) - Germany
- Bureau of Meteorology - Australia
- NRL Marine Meteorology Division - USA
- 557th Weather Wing - USA
- Geophysical Fluid Dynamics Laboratory - USA
- Meteorological Service Singapore (MSS) - Singapore
- Phillippine Atmospheric, Geophysical, and Astronomical Services Administration (PAGASA) - Phillippines
- South African Weather Service (SAWS) - South Africa
- National Centre for Medium Range Weather Forecasting - India
- Korean Meteorological Administration (KMA) - Korea
- Centre of Excellence in Simulation of Weather and Climate in Europe - Europe
- National Center for Atmospheric Research (NCAR) - USA
- NOAA Environmental Modeling Center - USA
- Euro-Mediterranean Center on Climate Change (CMCC) - Italy
- Plymouth Marine Laboratory - UK
- Barcelona Supercomputing Center (BSC) - Spain
- National Centre for Atmospheric Science (NCAS) - UK
- Centre for Environmental Data Analysis (CEDA) - UK
- ARC Centre of Excellence for Climate Extremes (CLEX) - Australia
- eWaterCycle - Netherlands eScience Center, University of Utrecht, TUDelft
(from the Cylc website)
For more details on how to run Cylc above what this page lists, please see the Cylc website.
Cylc DOI 10.5281/zenodo.2549475
Short paper in Journal of Open Source Software
Instructions for running
- In your case directory you can find the file Cylc.Instructions.txt. Open this file and copy the command after “- execute:”. This should follow something similar to:
gcylc $CASENAME.suite.cmip6
- Once you copy that command, execute it on the command line on the login node. It’s important to note that you can run that command anywhere on the file system and you do not need to be in a particular directory for it to run. Once you run that command, a window will open up that looks like the image below
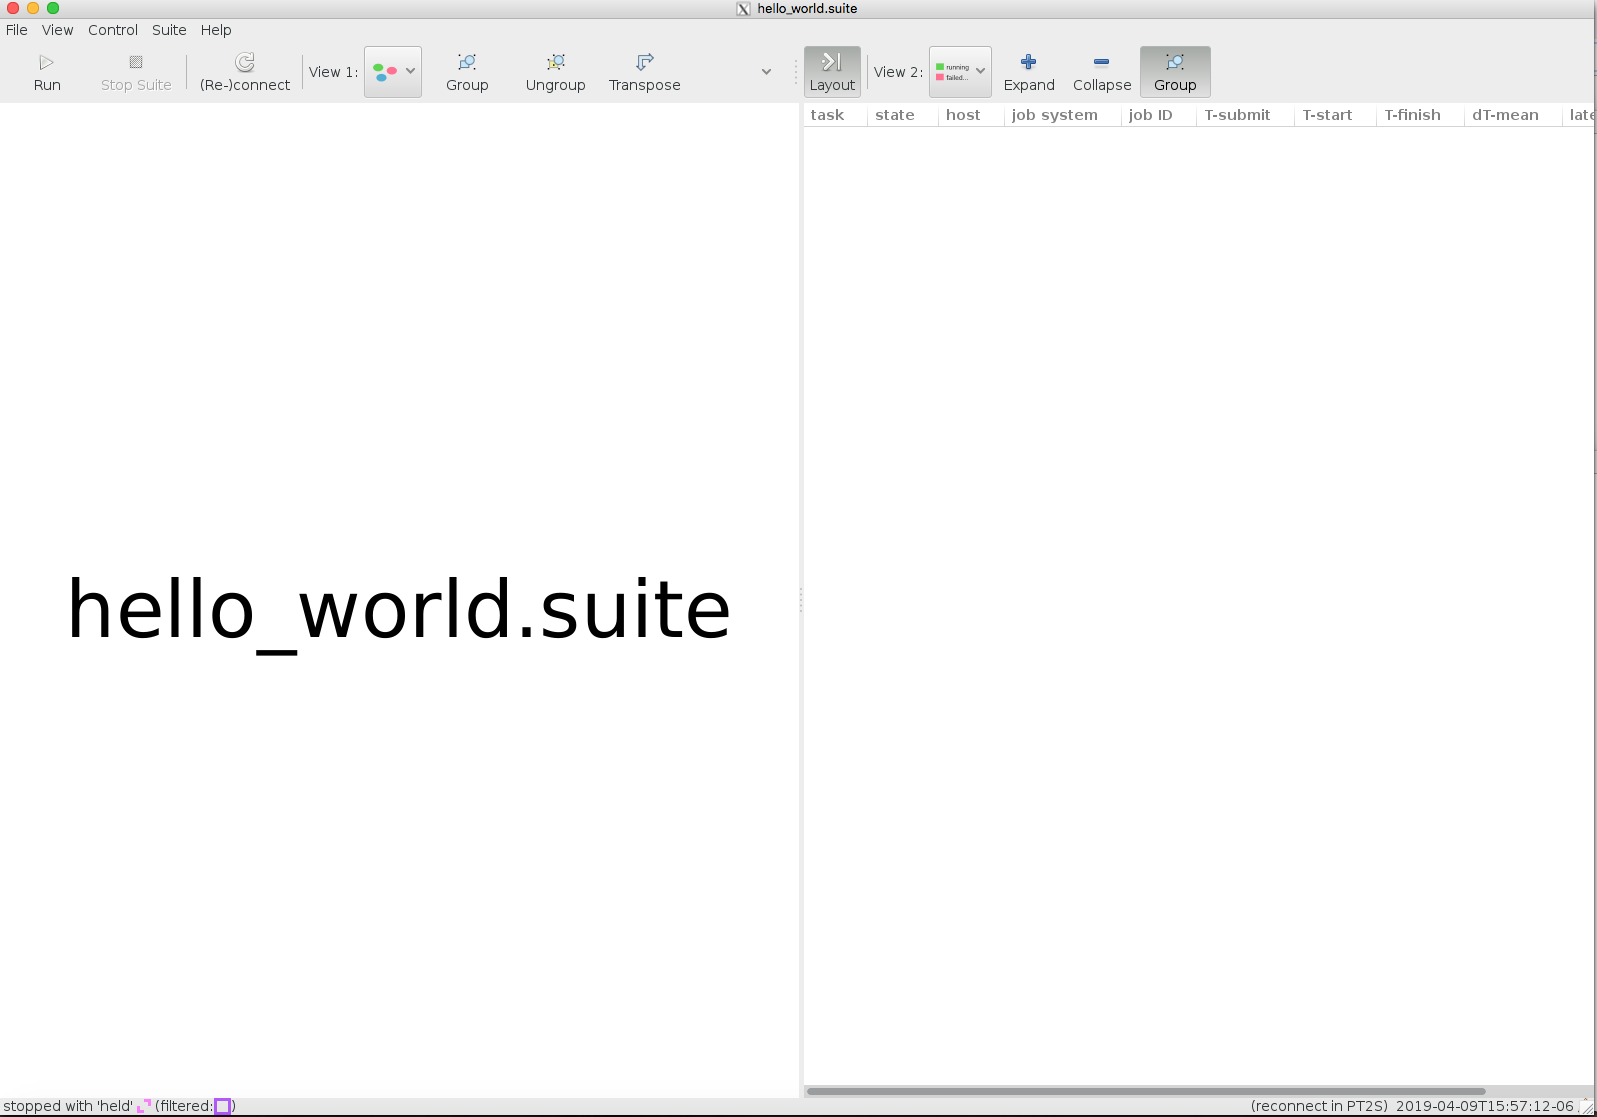
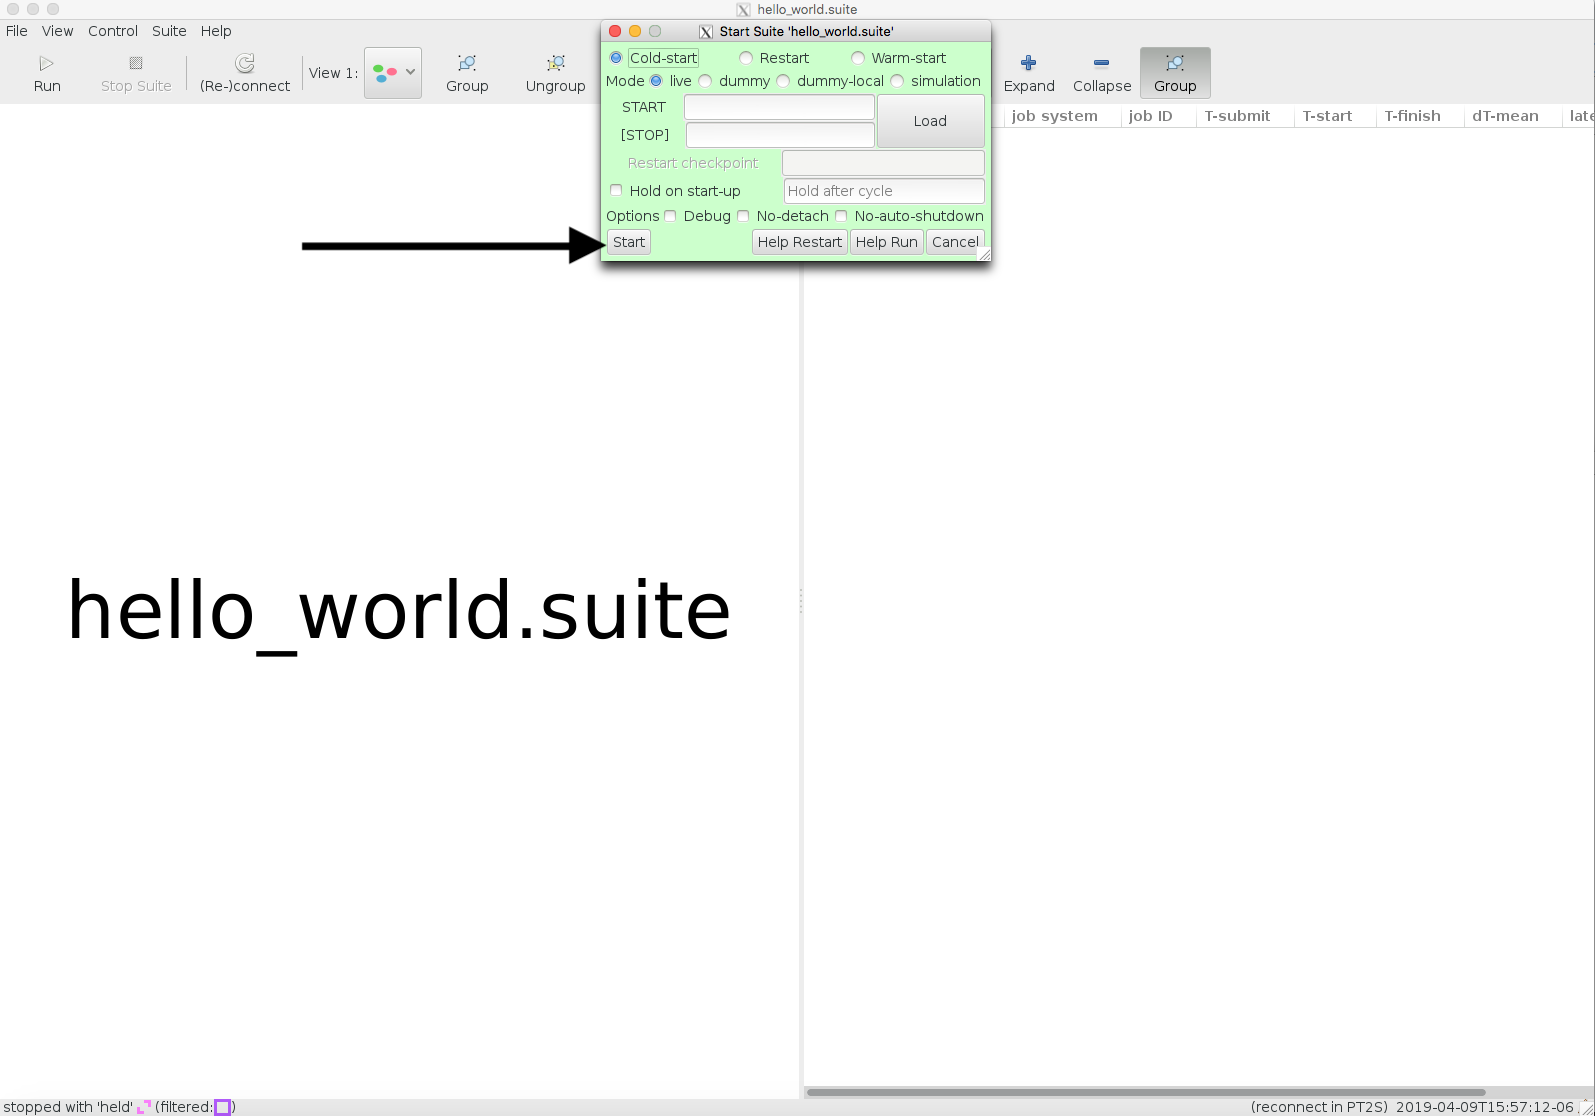
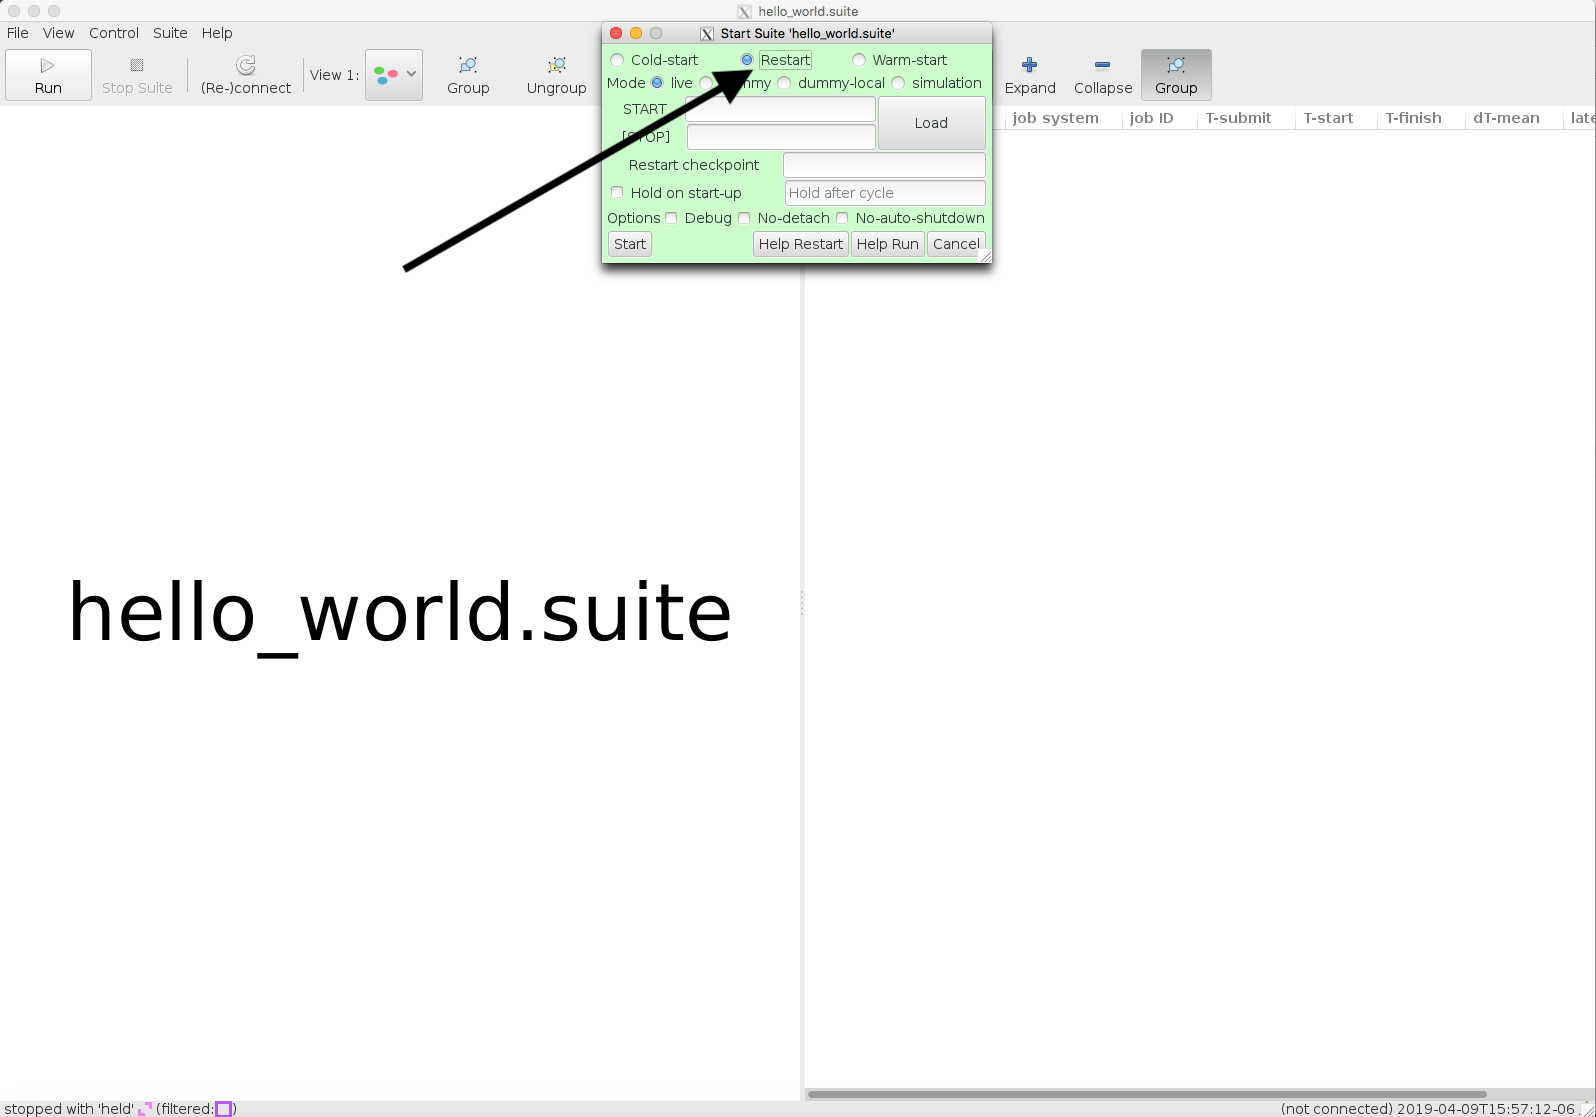
- To start the run, select the run button
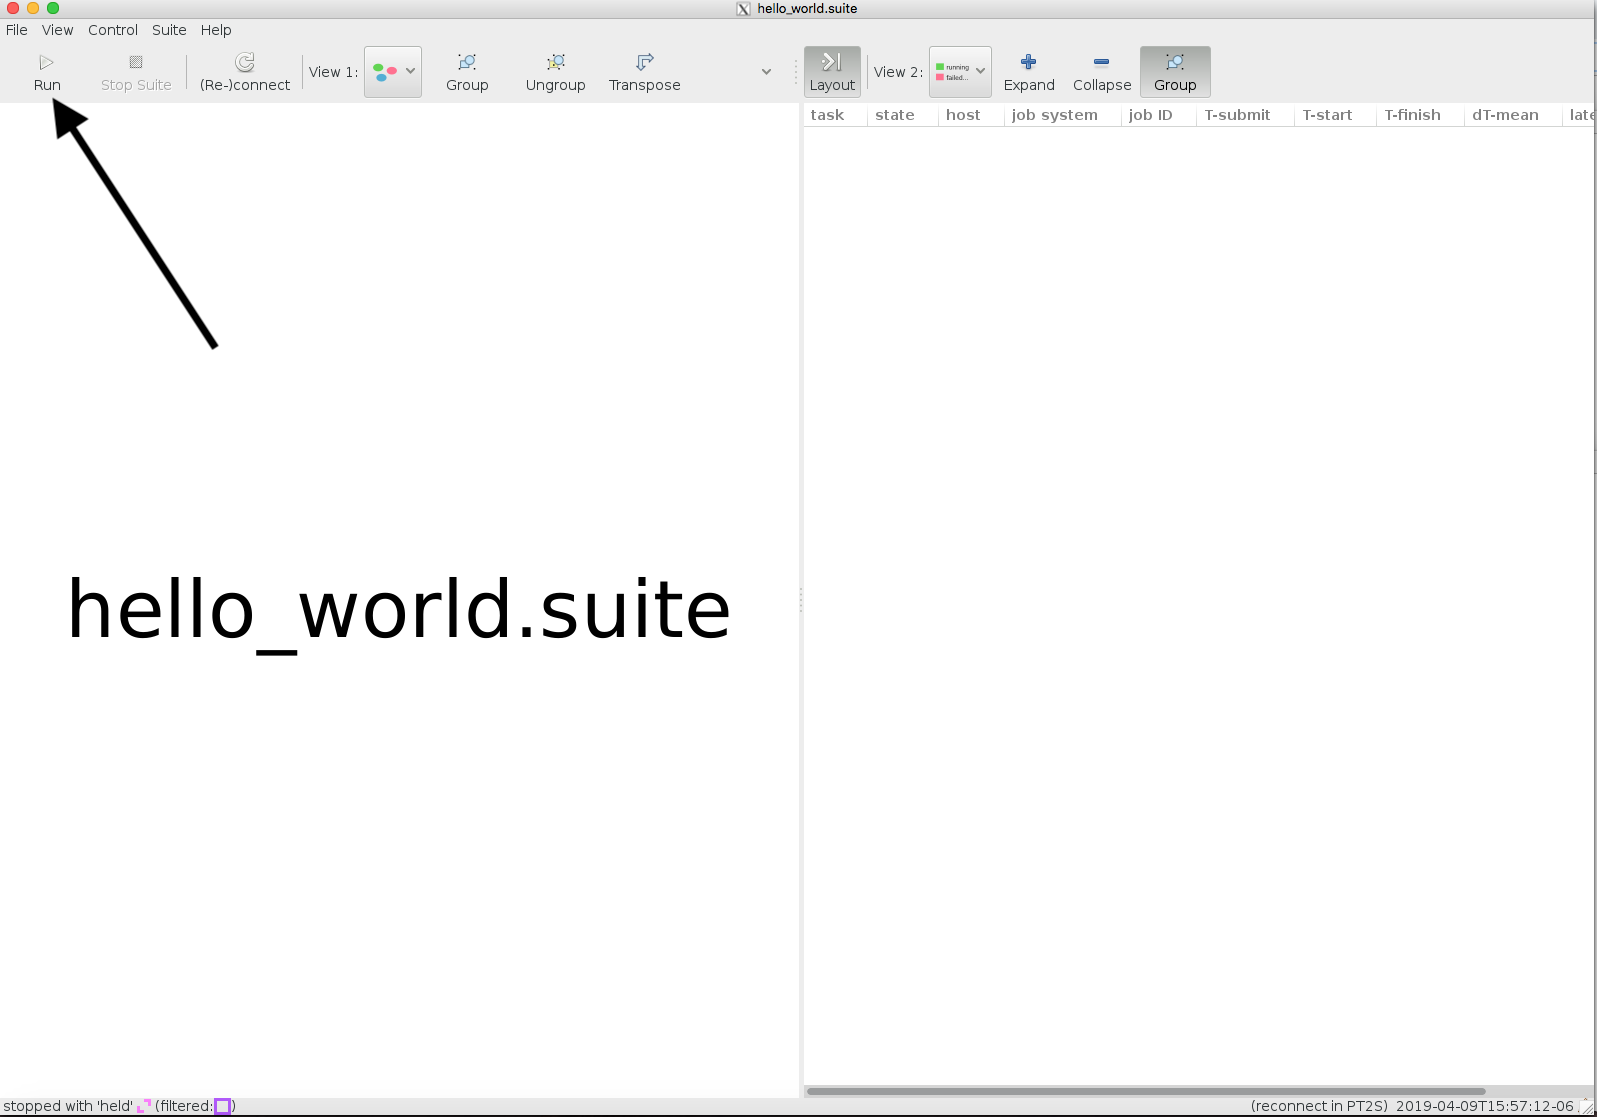
- After clicking run, a box will appear. If starting it up for the first time, the Cold-start radio button should be selected and you should leave it selected.
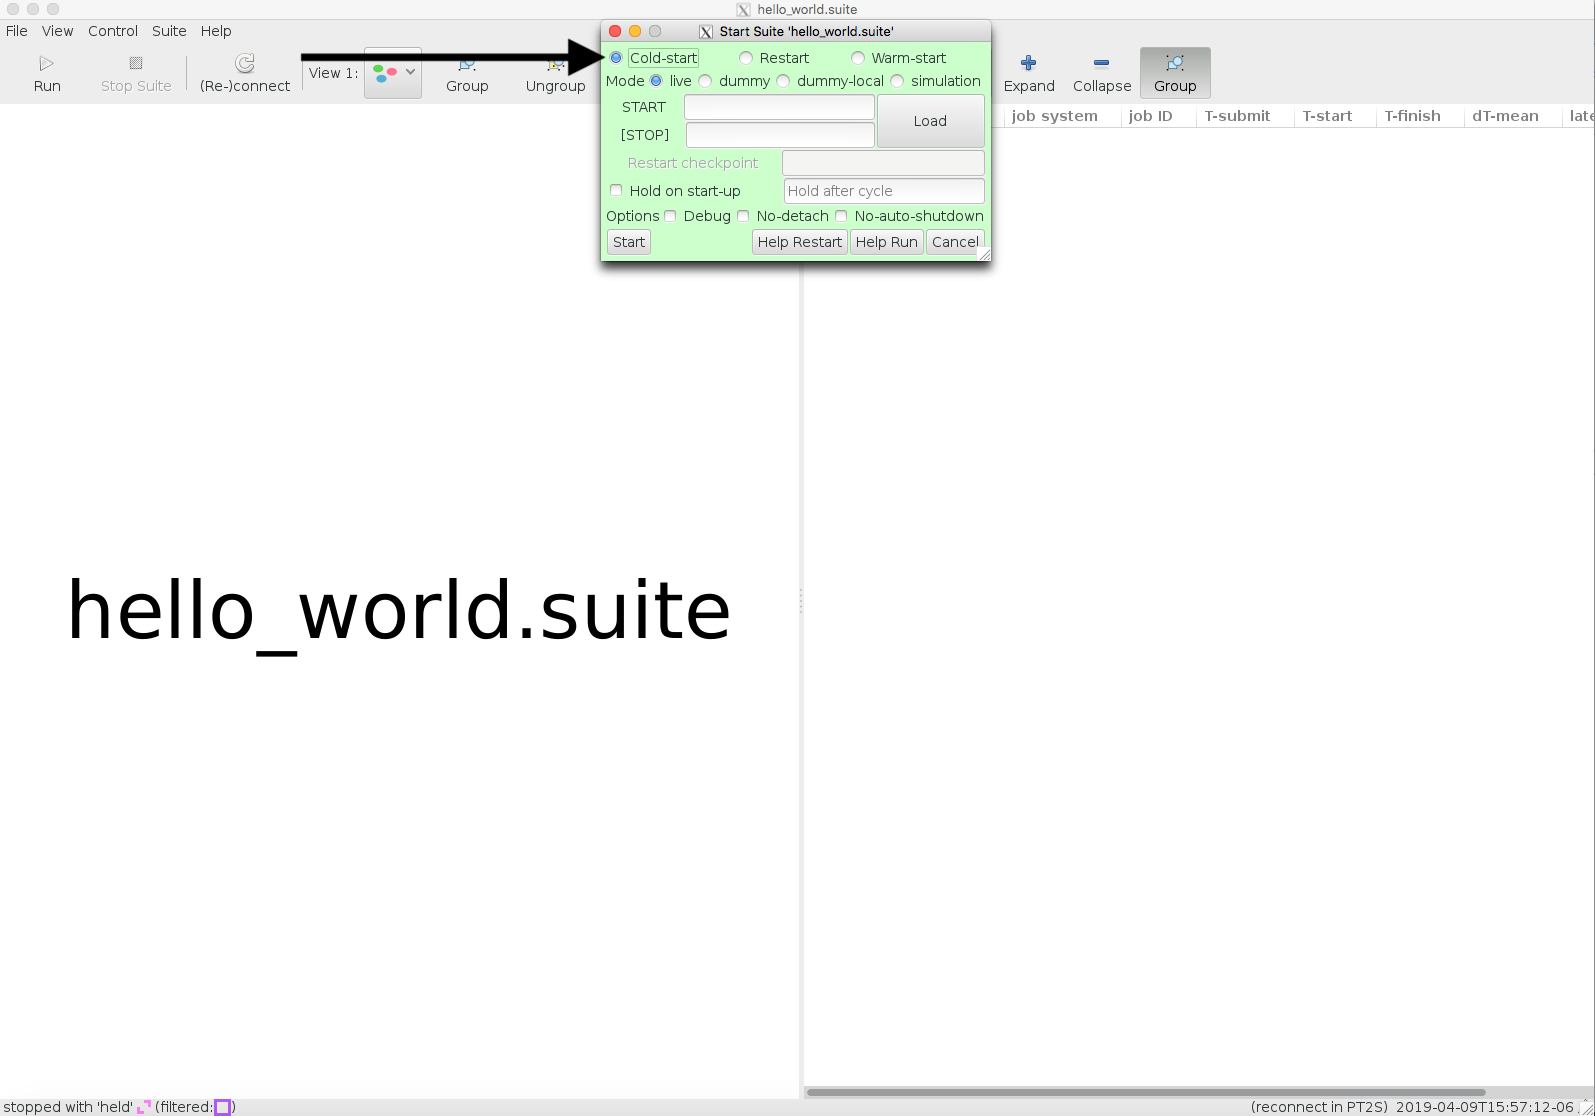
- Another option is to select “Hold on start-up”. When this option is selected, the workflow will be in a paused state when “Start” is selected. This option is preferred if you would like to make sure that the workflow graph looks correct before it starts submitting jobs to the queue.
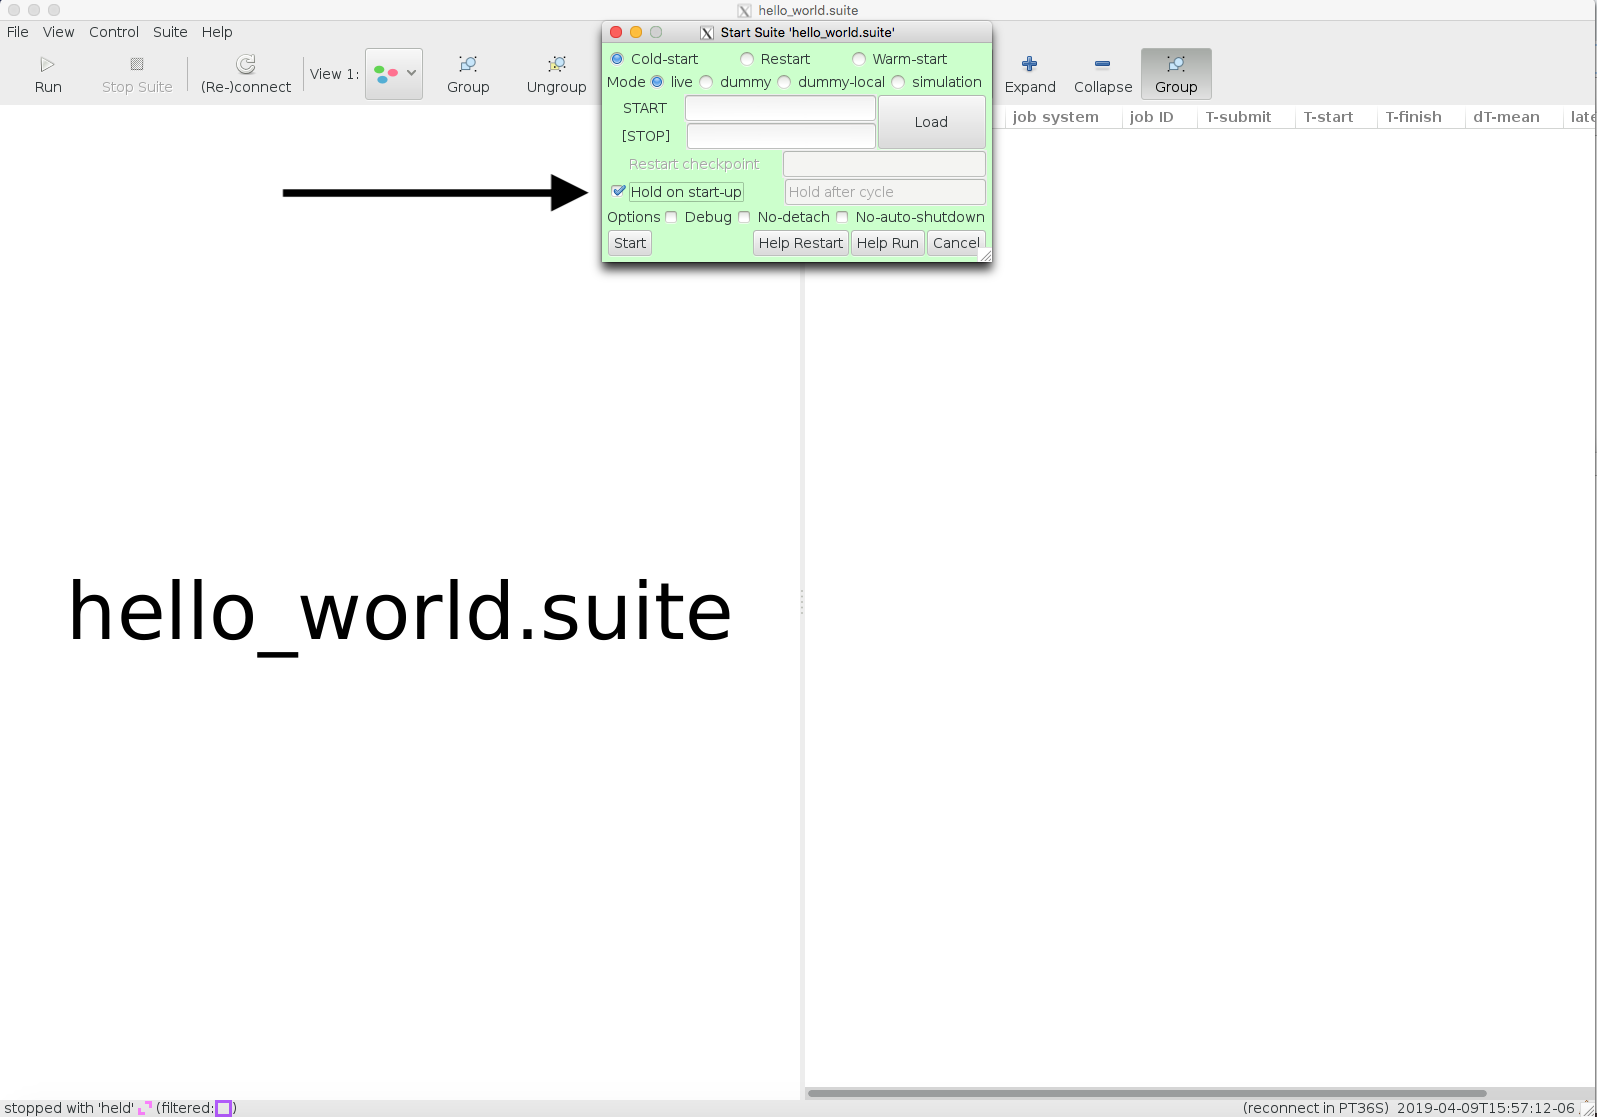
- Select the “Start” button.
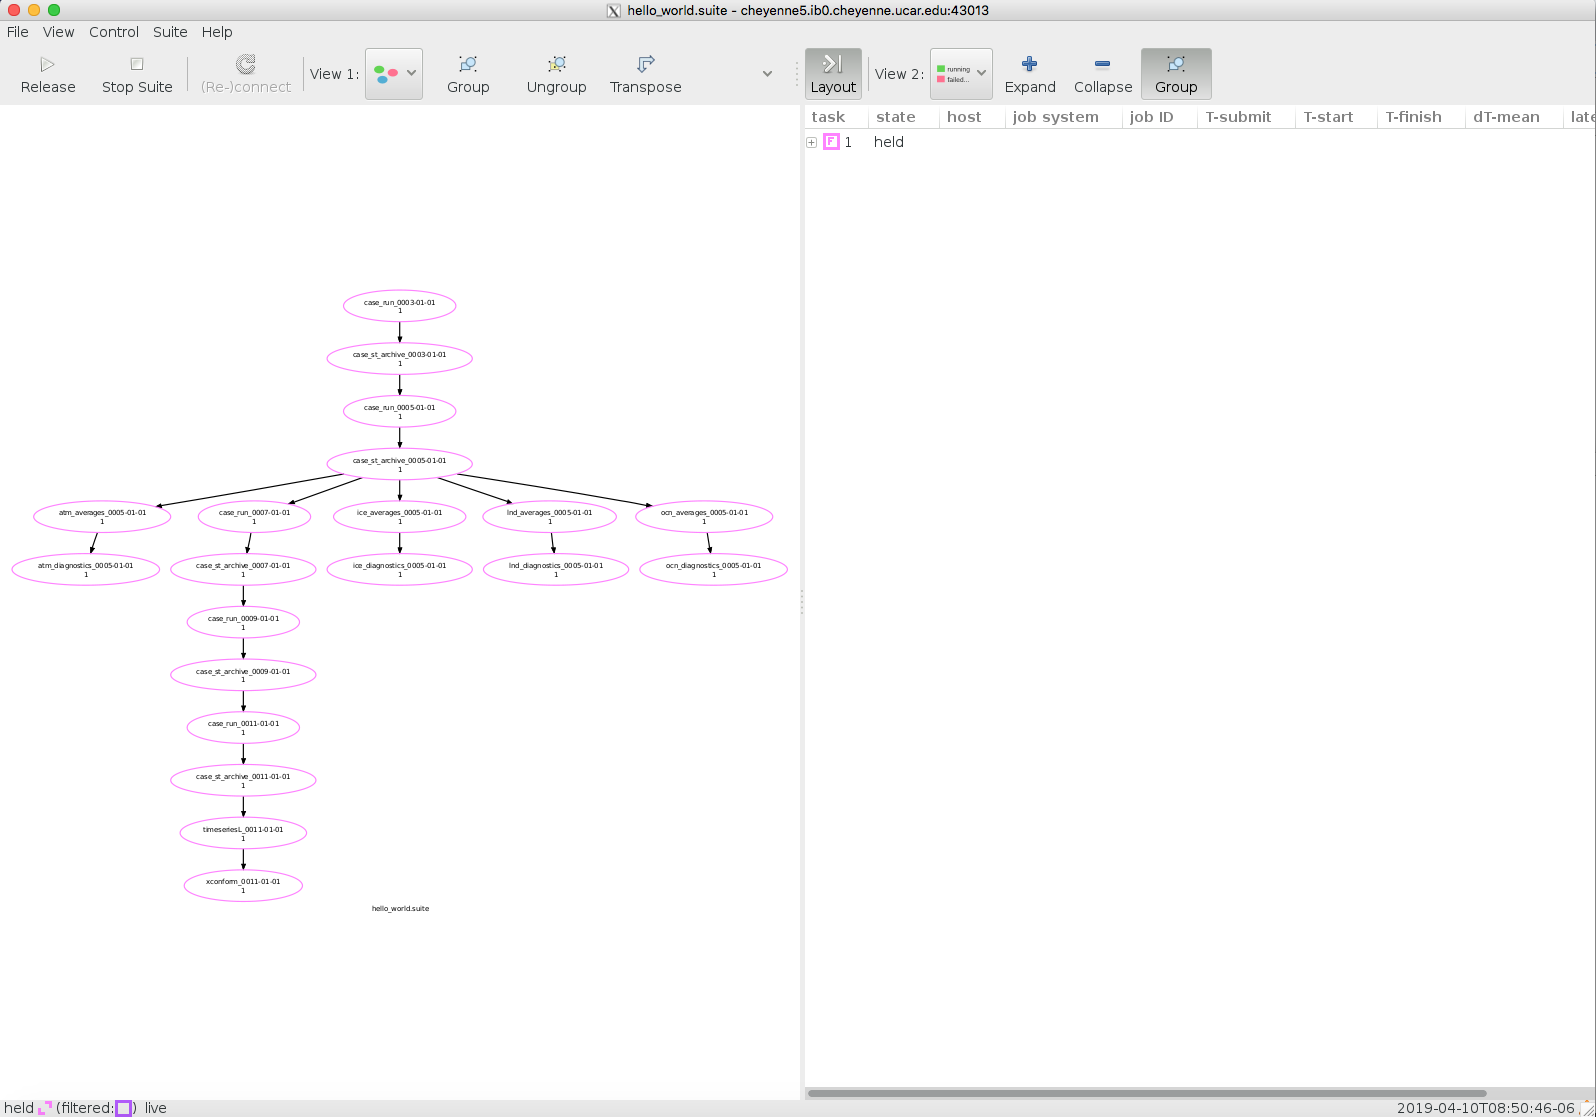
- If you selected “Hold on start-up”, the Cylc interface will look similar to the figure below with the tasks highlighted in a purple/magenta color.
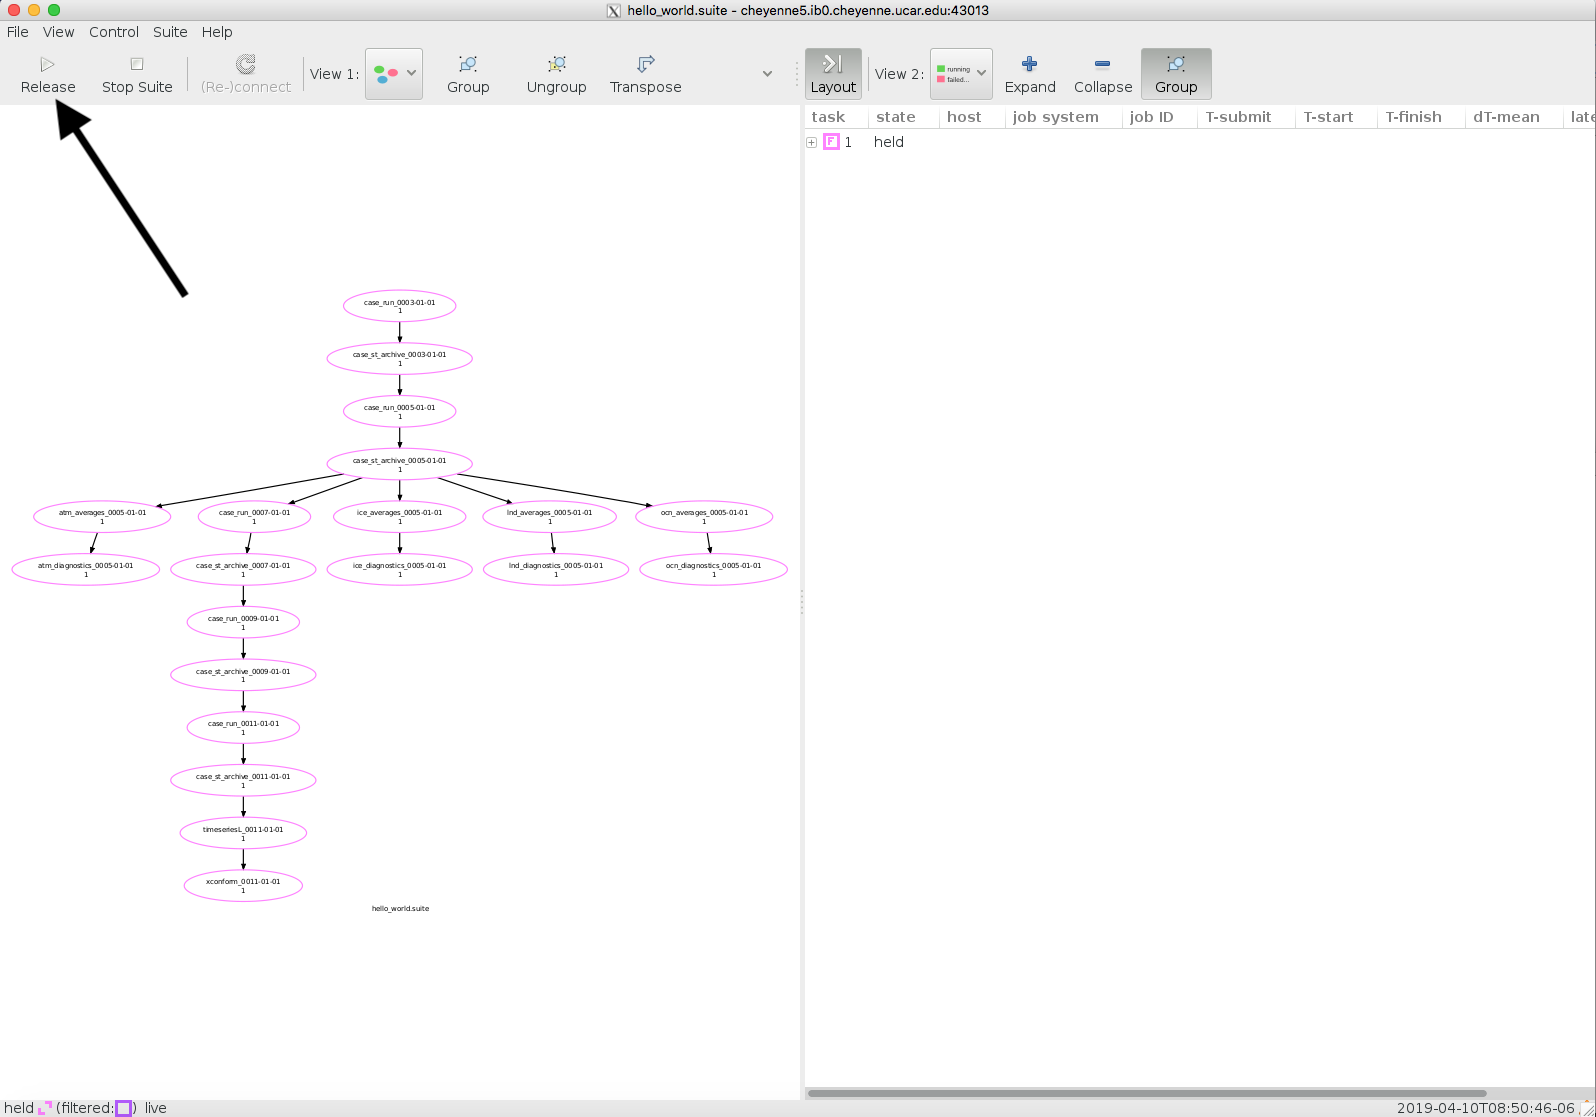
To start the run up after everything has been verified, select the “Release” button
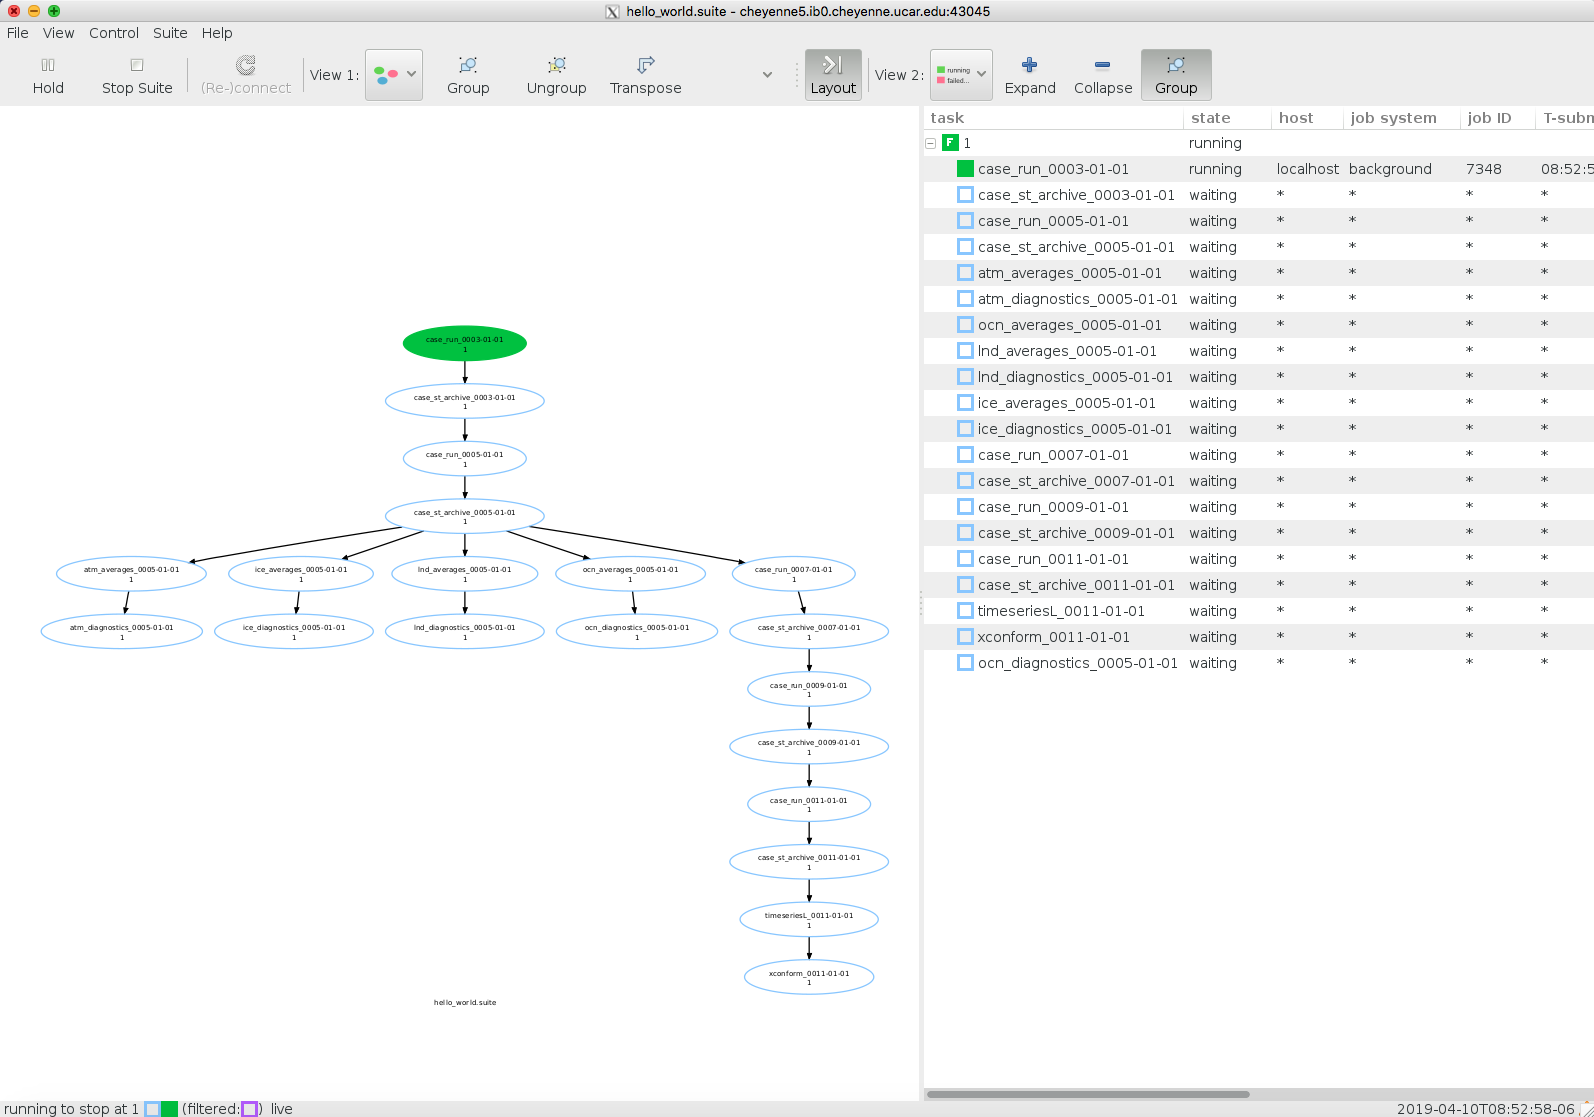
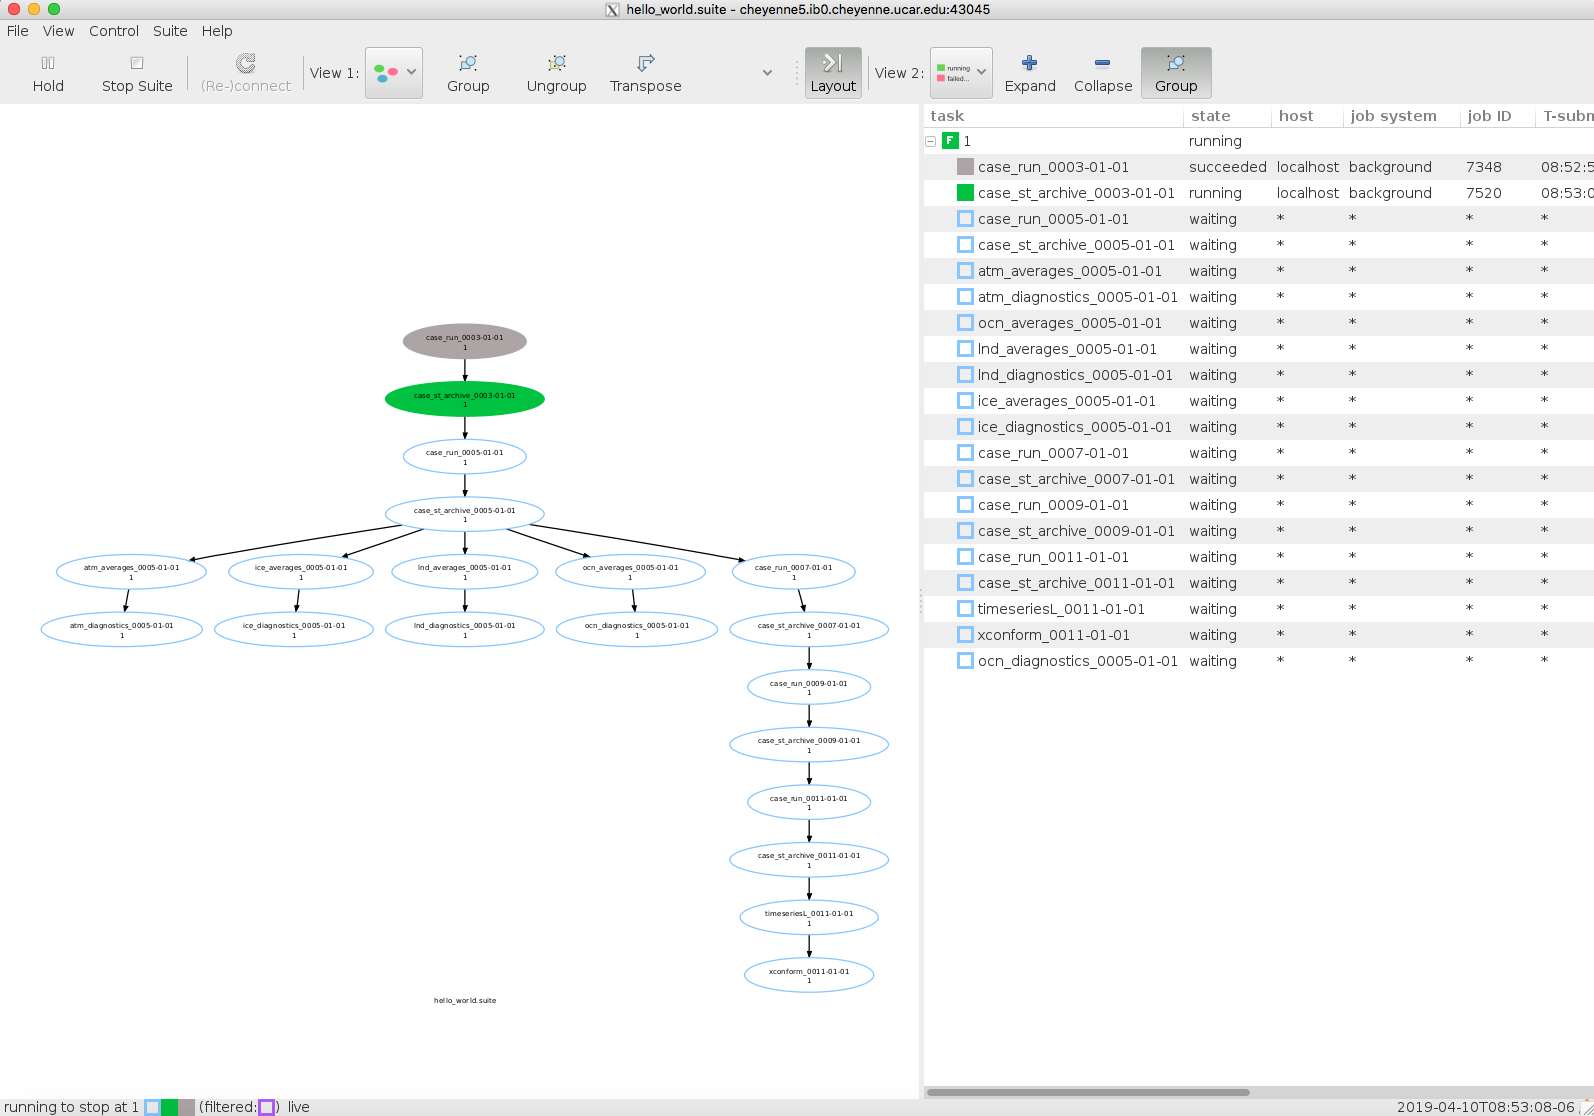
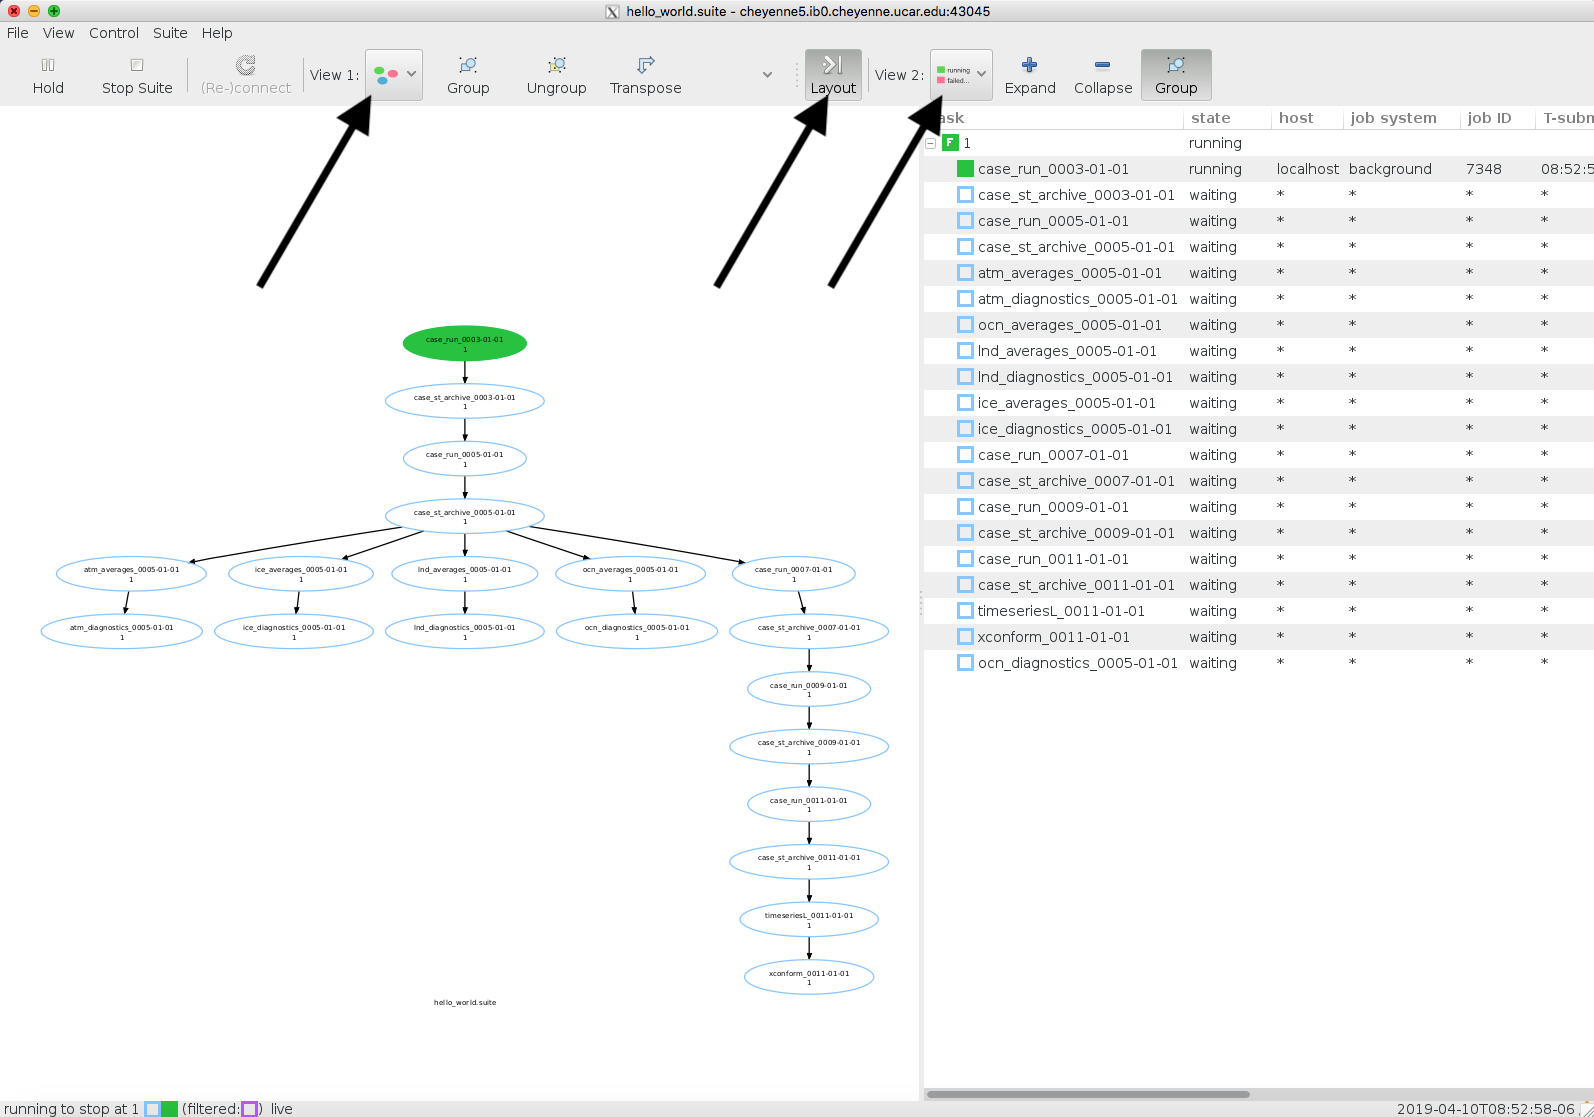
- If you did not select “Hold on start-up” or if you’ve just clicked “Release” from a “Hold on start-up”, the Cylc gui should look similar to the following with the task bubbles starting to change color.
- A light green color indicates that it was submitted to the queue.
- A darker green color means it’s running.
- A gray color indicates the task finished successfully.
- A magenta color means that it failed while submitting to the queue.
- A red color means that the task exited with a non-zero exit call meaning it failed.
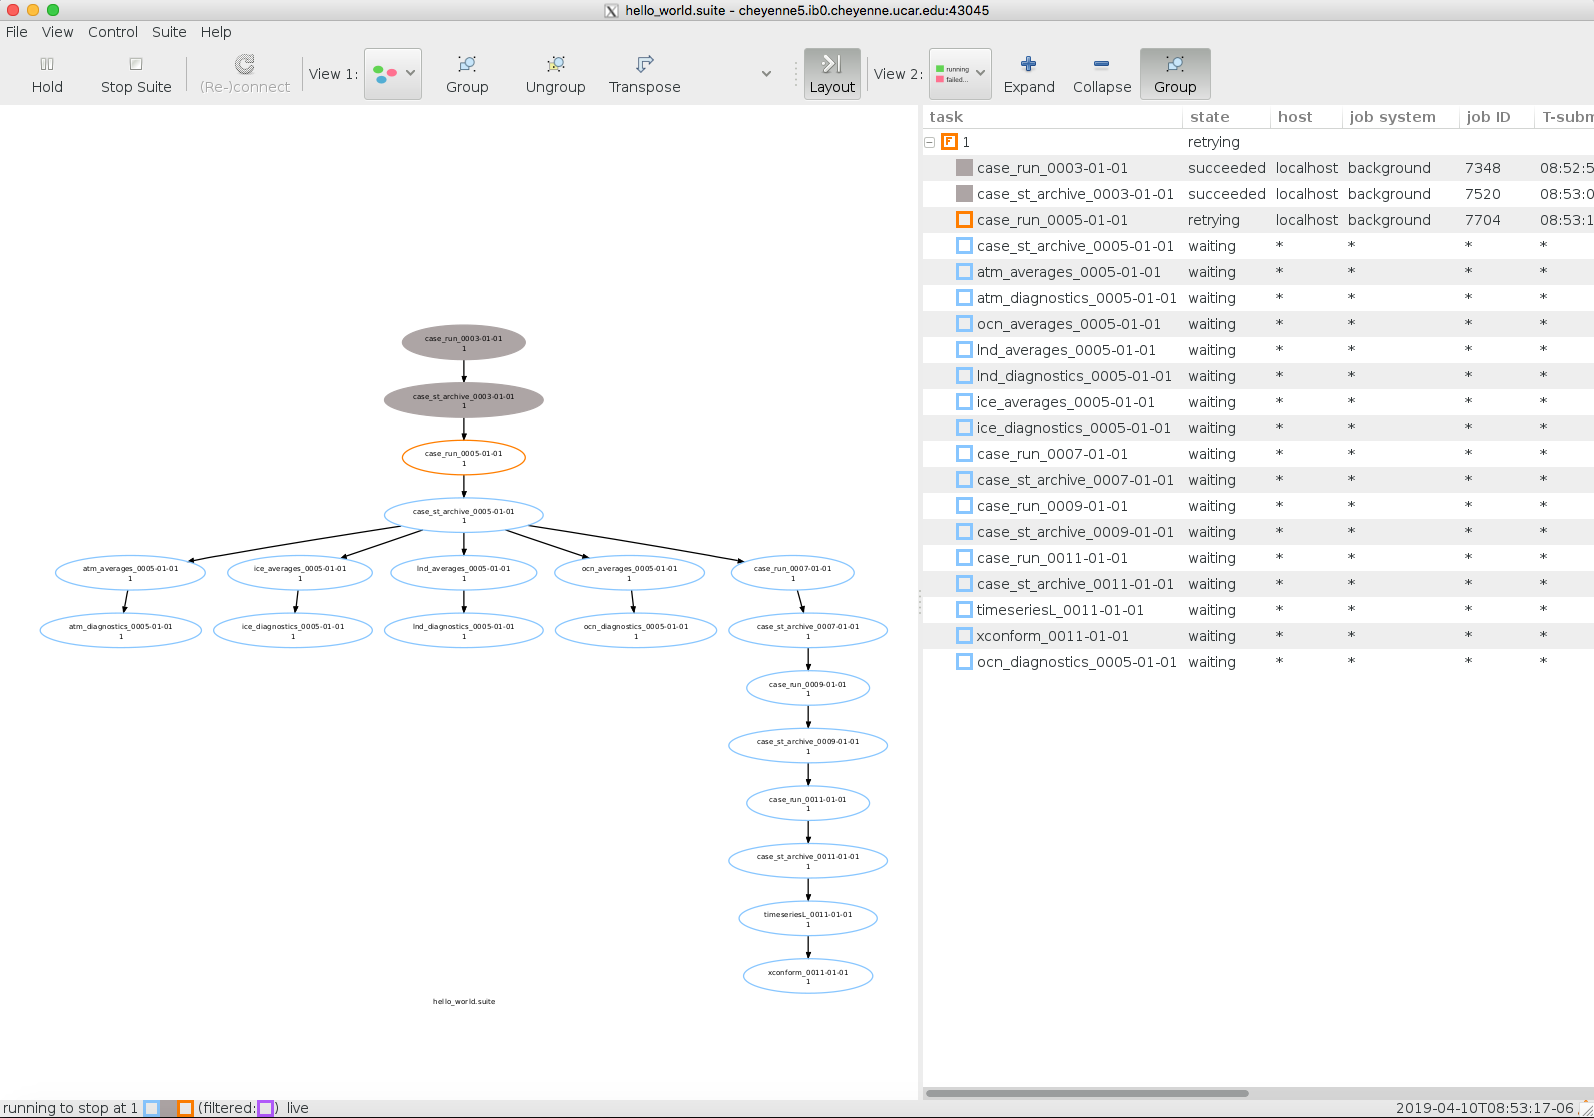
- If you noticed that a task is highlighted in orange like below, it’s indicated that the task has failed and it is waiting before it resubmits the task again. This is a form of fault tolerance within the workflow and it tries to submit CESM run tasks 4 times before it gives up with a failure.
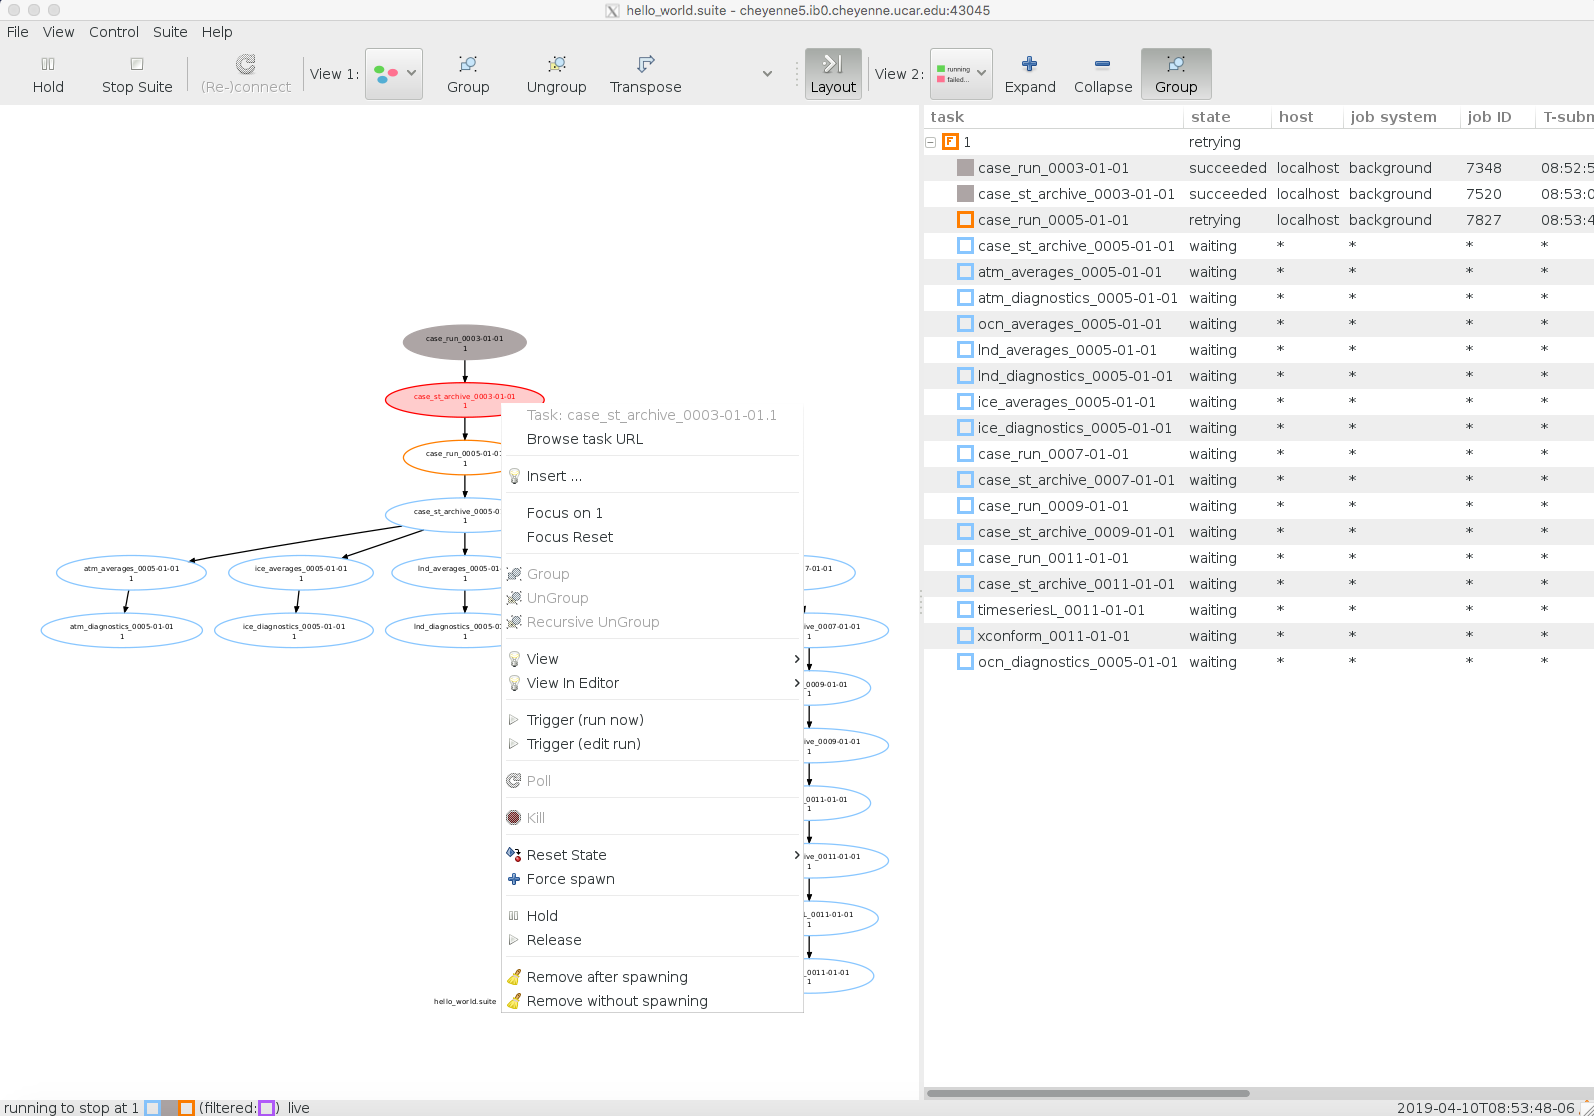
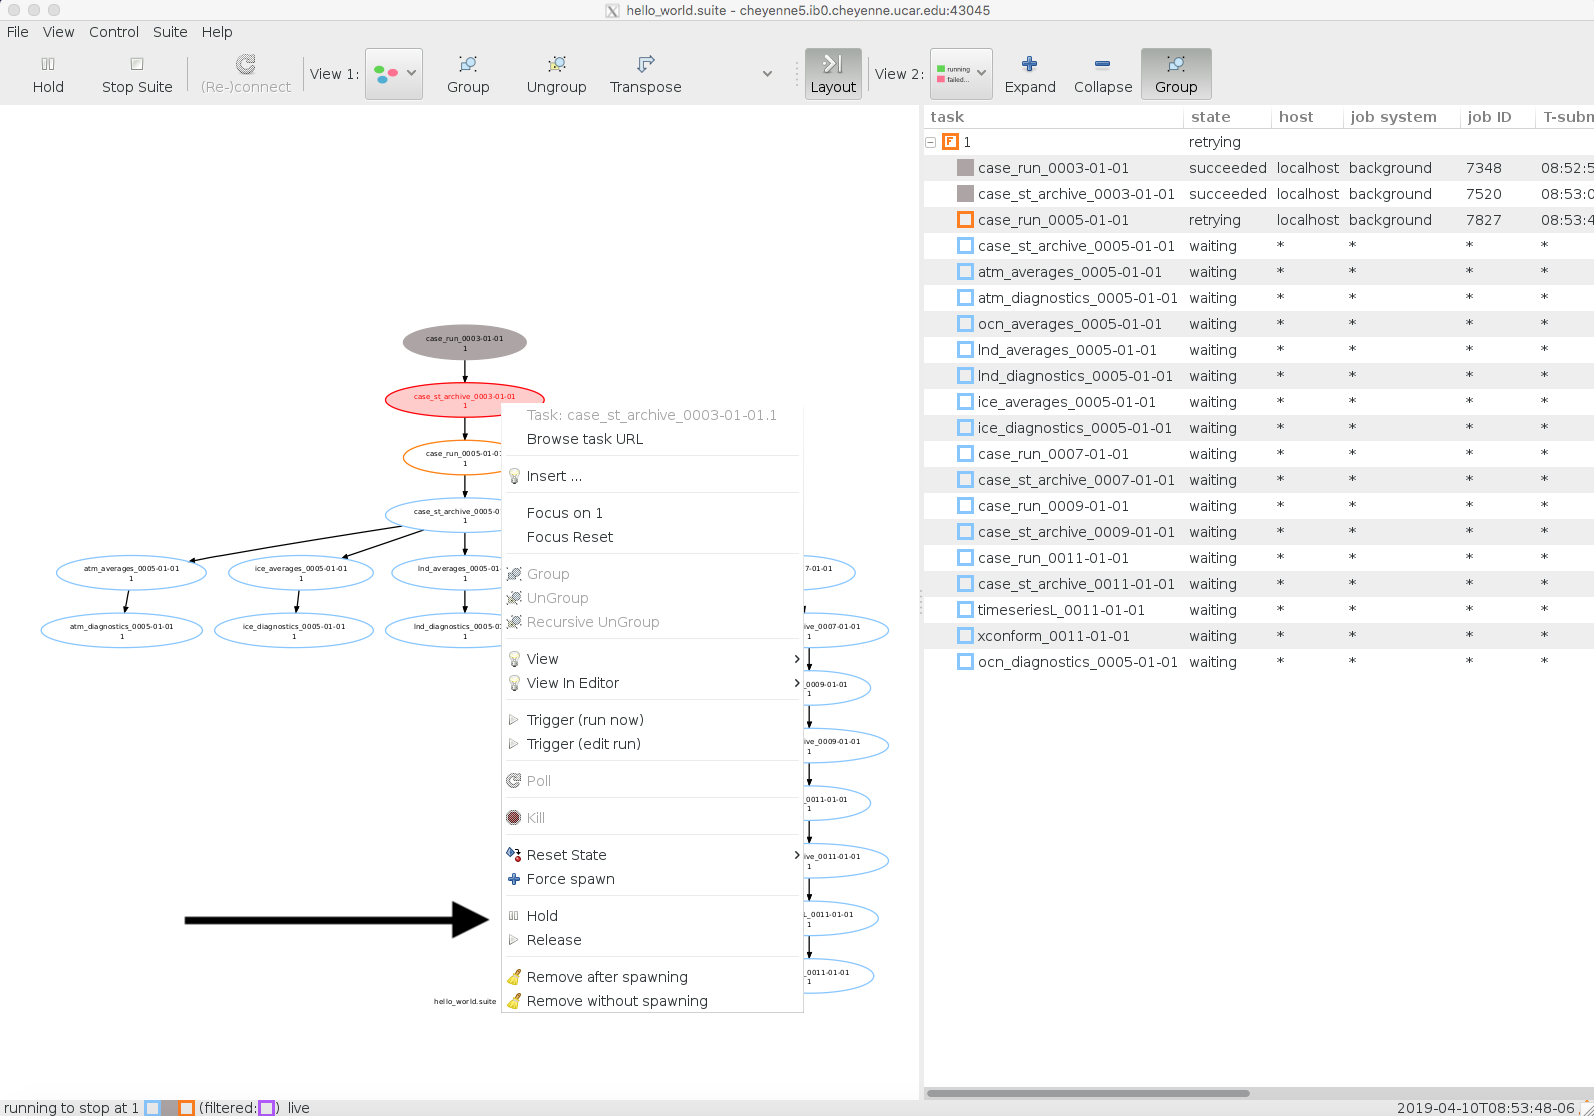
- At any time, you can right click on a task in either view and get a menu for that task.
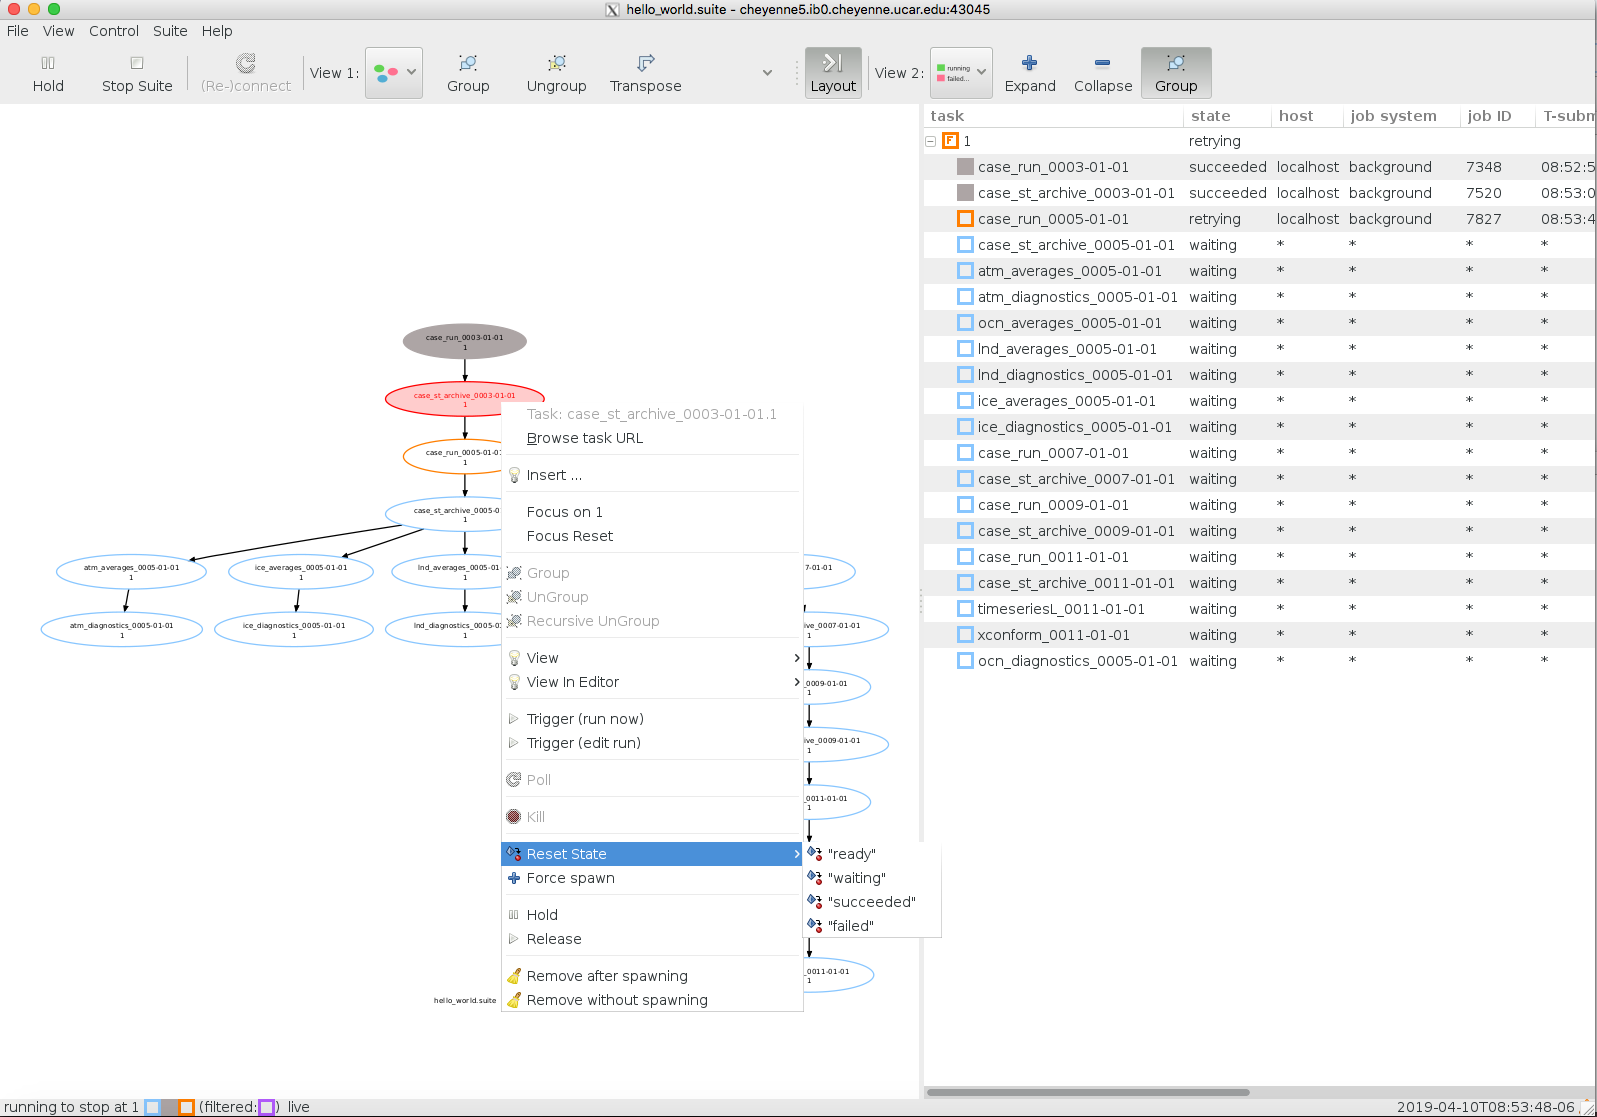
- If you select the “Reset State” option in the menu, you can change the state of the task to either “ready”, “waiting”, “succeeded”, or “failed”. Depending on how you would like the workflow to progress, you may need to change the state of a task. For example, if a task says it failed, but you know it actually finished okay, you can change it to “succeeded”. If you don’t want something to run, you can change it to “failed”.
- You can also choose to put a task on hold. You may want to do this if you want to pause the workflow at a certain point in the simulation in order to see if it is progressing as expected. To do this, select this option in the menu when you right click on the task where you want the pause to take place. To unpause it, you can select “Release” from the menu or start it up through the “Reset State” option and choose either “ready” or “waiting”.
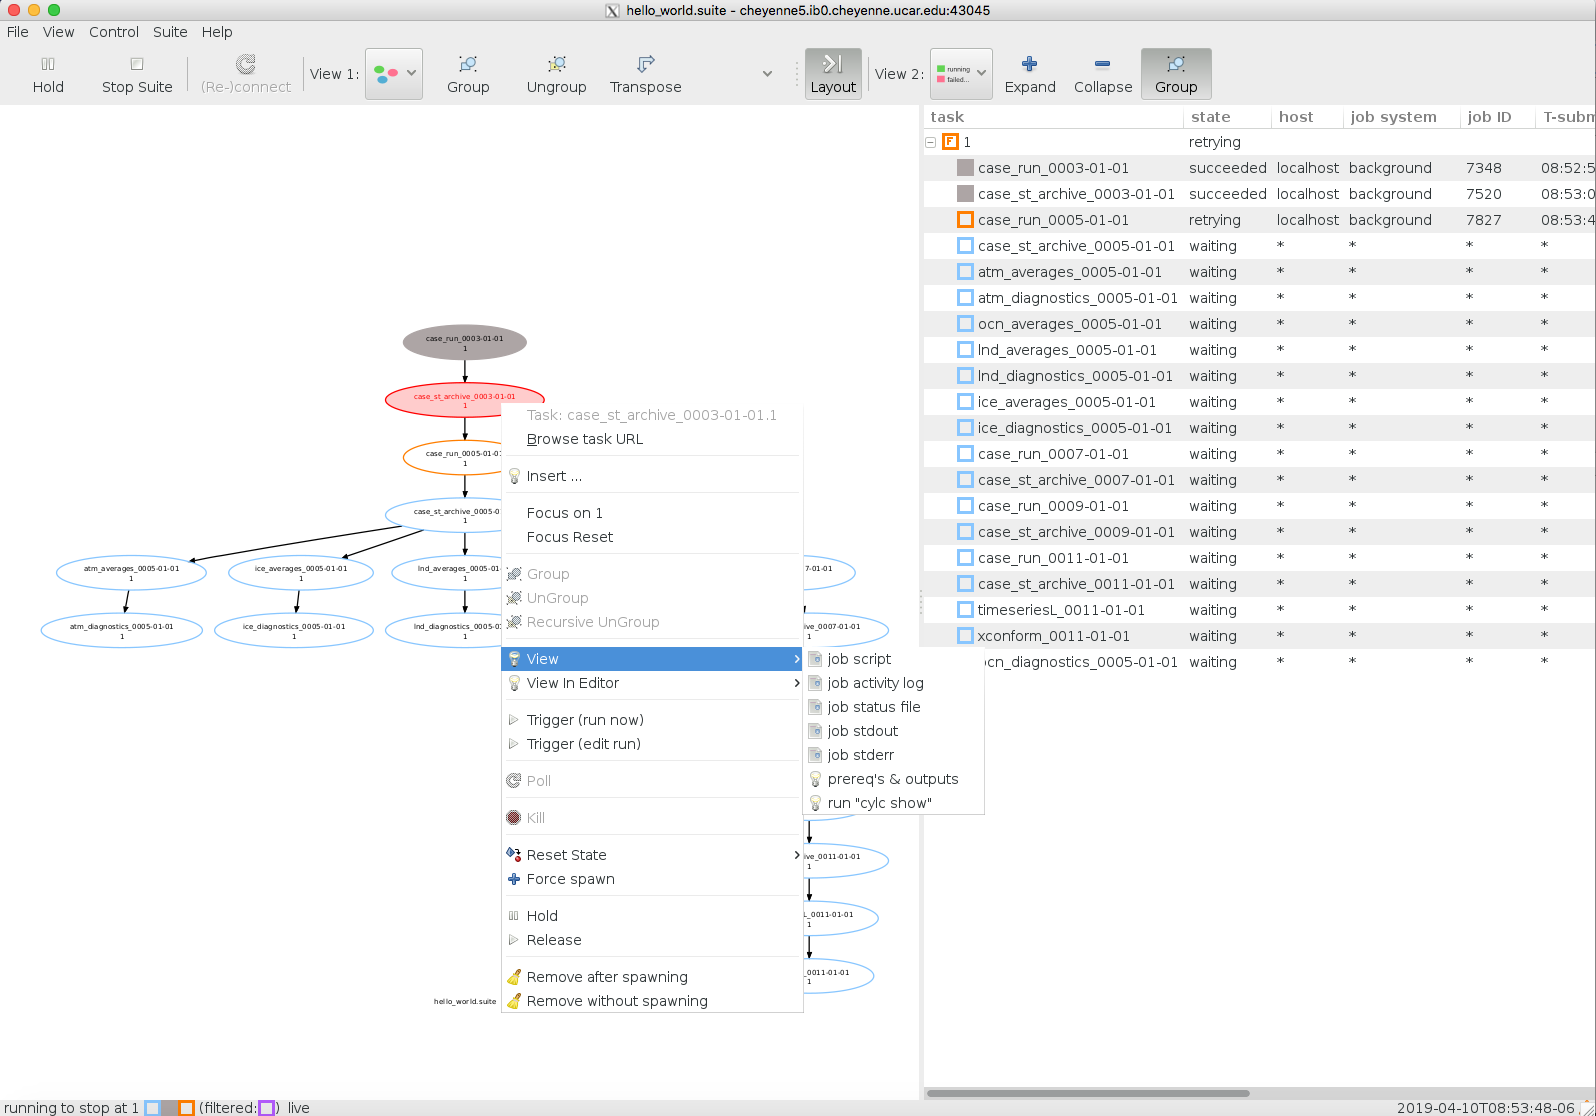
- You can also view the jobs script that was submitted to the queue and job stdout and stderr files though the “View” menu.
- The 3 options pointed to below, allow you to change the views of the workflow.
- If the workflow has stopped before the simulation completes, for example, cheyenne goes down, open the gui up. If you no longer see the workflow in the gui, select the “Run” button again. Then it is very important that the radio button “Restart” is selected. This will allow the workflow to continue in the same spot it was stopped at. If you click ‘Cold-start’ this time, you will erase the status and it will want to start the run from the beginning again.
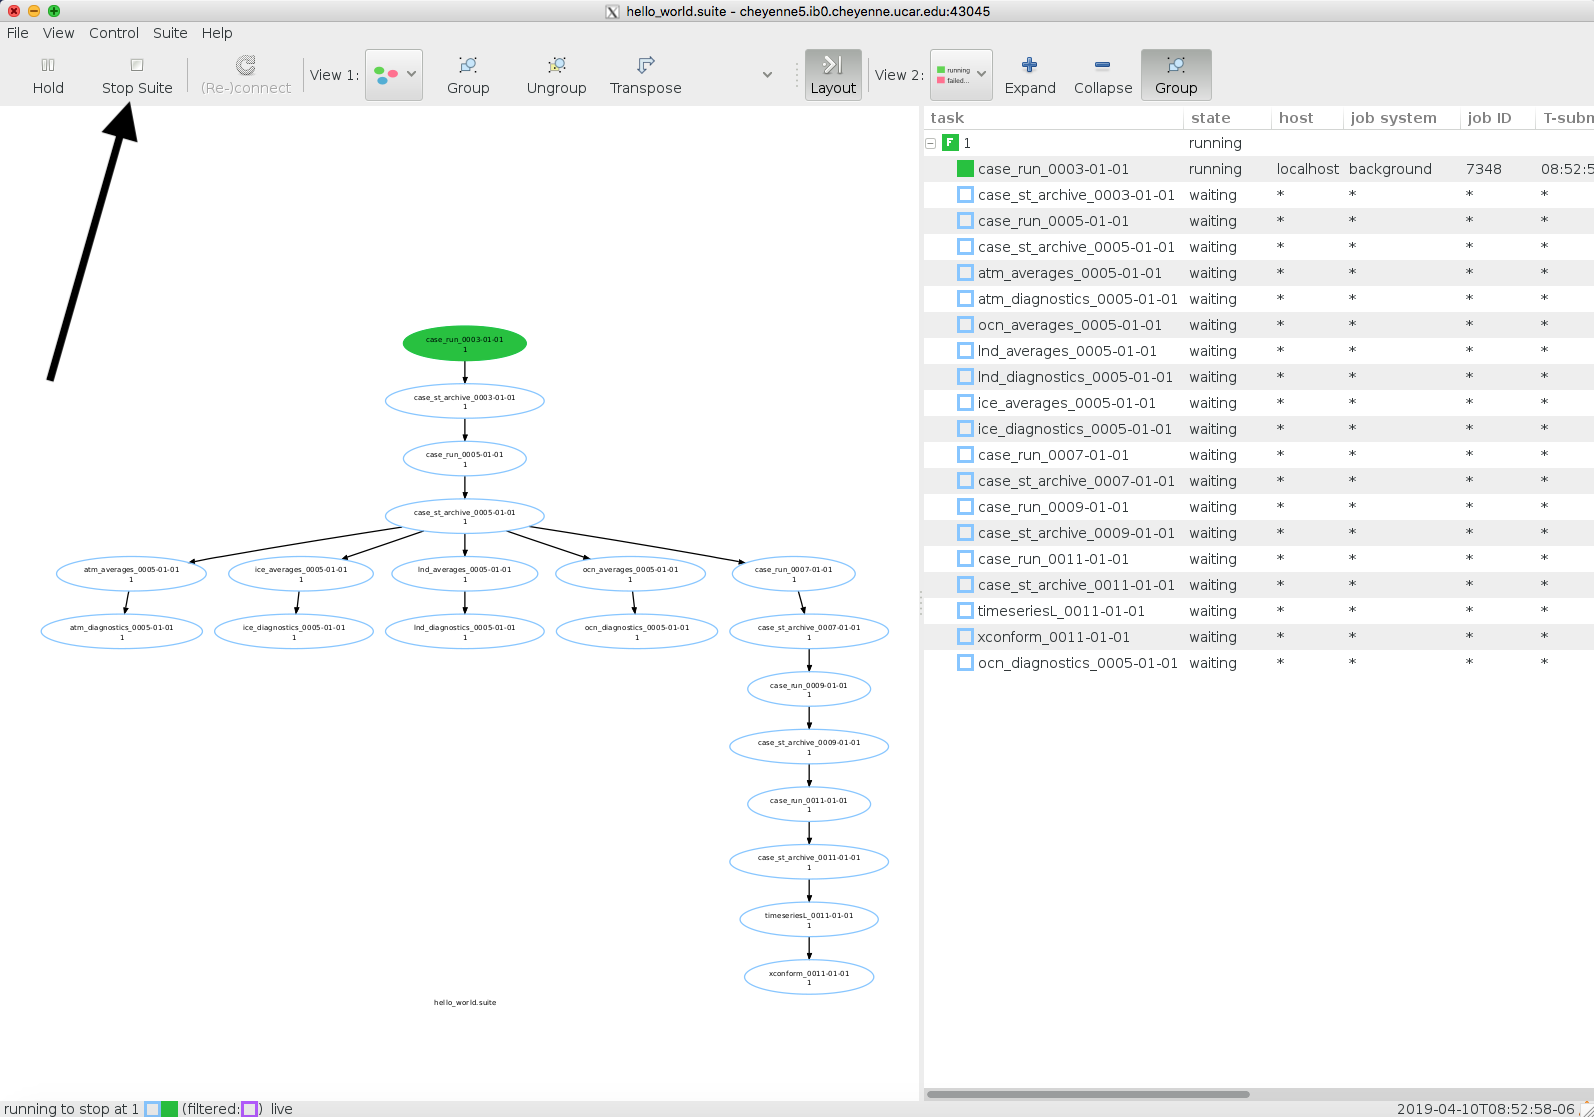
- It is very important that you do not hit the “Stop Suite” button on the gui. This will stop the gui after the current job finishes in the queue and you will have to restart it in order for it to continue. Only hit this button if you really want to stop the run.
- At any time, you can close the gui window either through the “File” menu option or by clicking the window’s red ‘x’ in the corner. When Cylc starts, it starts a daemon on the log in node that will continue to monitor and submit you jobs even if the gui is no longer open.